in this tutorial we like to introduce the simplicity of instantOLAP. You can click through the lessons or download the pdf document.
With 18 clicks from scratch to a report !
In this first lesson, we will create a simple configuration with a single dimension and an also simple query based on this configuration.
The configurationAll new configurations and queries created in this tutorial should be placed in their own folder. Use the “Create new folder” menu to create a new sub-folder in the repository. To open the menu, use the right mouse button on the root-folder of the repository.
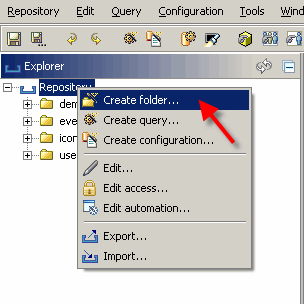
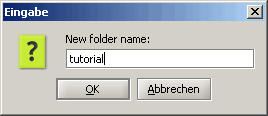
E.g. name the new folder “tutorial”. After you pressed the “Okay” button, the new folder will appear in the Repository-Explorer.
Create new a configuration-file
First of all you’ll have to create a new configuration for your tutorial-lesson. A configuration defines all dimensions, facts and cubes for the later use in your queries. Every query refers to exactly one configuration.
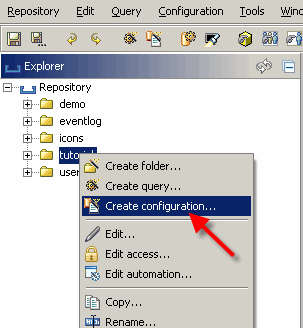
Use the “Create new configuration” button to create a new, empty configuration in your root folder. This button is placed in the toolbar at the top of the workbench. After pressing this button, the configuration-wizard appears:
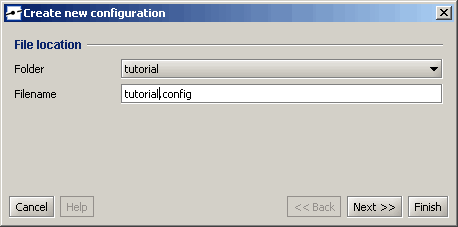
Fill out the configuration-filename (e.g. use “tutorial.config” as the filename for your new configuration) and press “Finish”. A new window will open, showing the new configuration.
Add the database

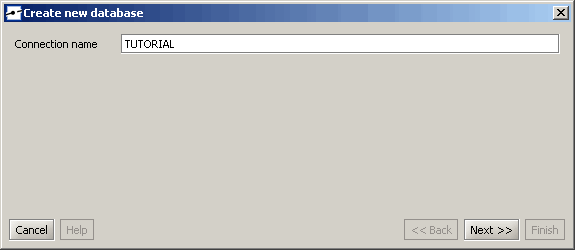
Another wizard will appear, this time asking for database-connection properties. There are two ways to connect a database in instantOLAP: By using a predefined connection supplied by your application-server-administrator or by using a jdbc-driver. We will use the first method because there is already an existing connection in the standard-installation of instantOLAP.
As first, you must provide a logical name for your datasource. This name does not have to be equal to the real database name, but it must be unique if you define more than one datasource in your configuration. E.g. use “TUTORIAL” as the name for the datasource.
The use the “Next >>” button to continue. Now the dialog will ask you for the type of the connection. Use “Connect predefined JNDI datasource” to connect the predefined datasource as described before.
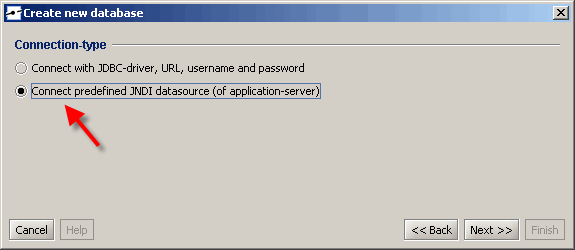
Choose the wanted predefined datasource in the following screen. There are three datasources in the standard installation of instantOLAP, we will use the source “java:comp/env/jdbc/TutorialDS” (this is the standard notation for datasources in Java, even on different application servers).
Then use the “Next >>” button to continue to the last screen of the database wizard. Here you can set the Schema and Catalog. Because the HSQL-database does not support any of this, both selectors stay empty and you can finish the wizard with the “Finish” button.
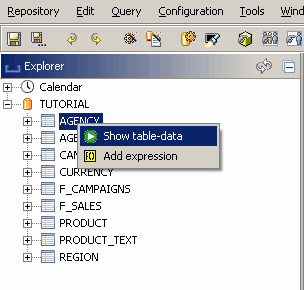
After you created the datasource you can explore its content. The new datasource appears in the Explorer at the left border of the workbench. Open it too see its tables and their columns. You also can also execute some SQL-statements or display the content of a table by using the context menu of the datasource or its tables.
Create the product-dimension
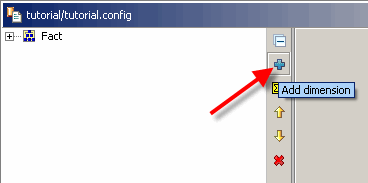
The the dimension wizard will appear. Here you can provide the name of the new dimension and the name (id) of its first member-key.
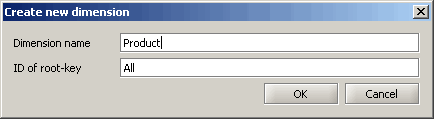
Change the dimension-name to “Product”. This will be the first dimension in your configuration. The name of the root-key (by default “All”) can be left unchanged (the root key is the topmost key inside a dimension).
Click on “OK” and validate the definition of your new dimension inside the dimension-editor by opening it in the dimension tree.
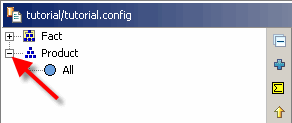
This is the simplest possible dimension, containing nothing else than the mandatory root-key.
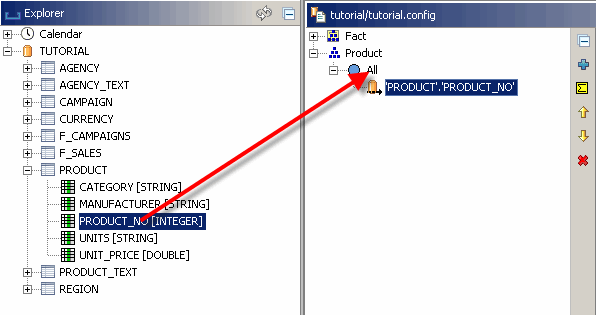
Because we want more members inside the product dimension, we’ll import data from the database-table “PRODUCT” into the new dimension. To create a loader for this, open the PRODUCT-table in the Explorer (at the left border of the Workbench) and drag it’s column “PRODUCT_NO” onto the root-key of the dimension. After you dropped the column, a new loader will appear under the root key. Now for every value occuring in the PRODUCT_NO column a key will be generated and placed under the root-key of the dimension.
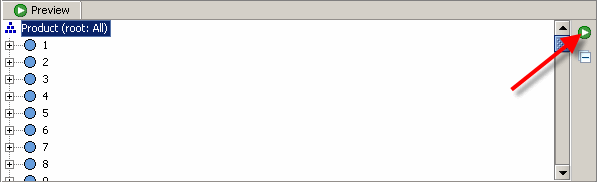
You can build the dimension with the green preview-button at the lower window of the dimension editor. After the dimension was build and loaded, you can explore it’s keys here.
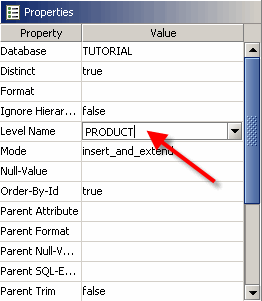
After generating the first keys of the dimension, you should assign a name to the new level in the dimension. Do this by selecting the new key-loader and changing its properties in the property-editor at the bottom-left of the Workbench. For each key-loader there is a property named “Level Name” which is empty after creating a new loader. Now change the name to “PRODUCT” and confirm your change by pressing the return key.
Now the first dimension of your configuration is finished.
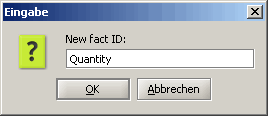
Add a new fact
This opens the fact-wizard where you can define the name of the new fact. Choose “Quantity” as its name.
The new fact will appear as a new key inside the Fact-dimension. The fact-dimension is a mandatory dimension which contains all facts as a key. Open the fact-dimension in the dimensions-tab to see the new fact.

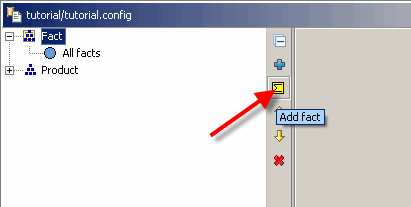
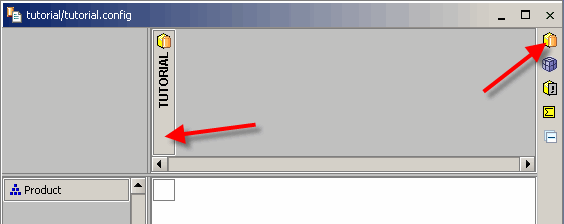
Create a cube
Use the new “Add SQL Cube” button of the toolbar to add the first Cube to the configuration (a SQL Cube loads the value for facts from SQL-databases). A new column will appear in the cube-editor. The bold title of the new cube shows the database to which this new cube is connected to (because there is only one datasource, you will not have to change it).
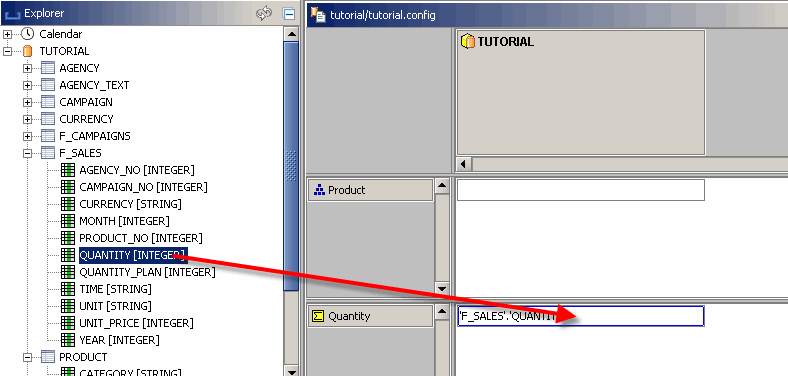
Now you can connect the new cube with the fact-table from the database. At first, you can select the column containing the value of the fact “Quantity” by dragging it into the cell of the row of the fact. The fact-table of the TUTORIAL database is the table named “F_SALES”, the amount-column is called “QUANTITY”.
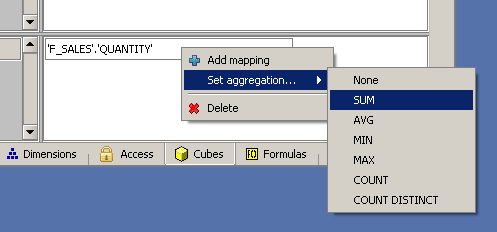
You must also define the aggregation for this fact which will be used as the aggregation when loading data out of the database. Use the right mouse-button in the fact’s cell to open it’s popup-menu and select “Set aggregation…/SUM” to set the aggregation to “SUM”.
After linking the fact, all dimesions on which this fact depends on must also be mapped. In this case this is only the product dimension.
In the F_SALES table, there is a column name “PRODUCT_NO” containing the ID of the sold product. Drag this column onto the cell of the cube corresponding to the product dimension.
Now each record of the sales-table is connected to a product by it’s ID.
Save the configuration
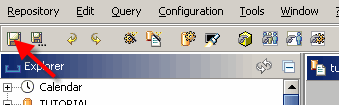
The first version of your configuration is finished and you are ready to create your first query. But before creating a new query, you must save the configuration to make it visible for queries with the “Save” button of the workbench toolbar.
Build the query
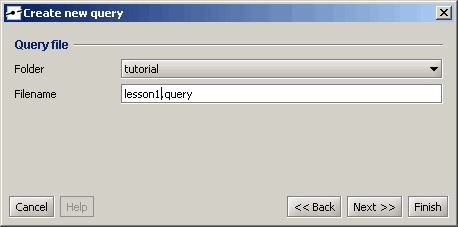
Create new a query-file
Creating a new query is similar to creating a configuration. Use the button “New query” of the context menu of your folder. After using the menu item, a new wizard will appear.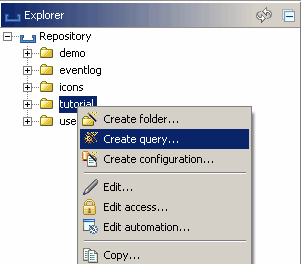 When creating a new query, you must supply some mandatory information in the wizard. The most important setting is the cube the query should be based on. The wizard will preselect the first configuration in the same folder as the default configuration. Because there is only one in the folder, you can choose the selected configuration and press the “Next >>” button.
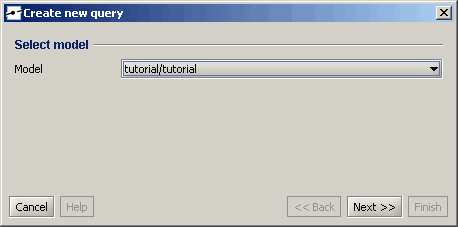
You also can set the filename, the name (this is the short name of a query shown in the navigation) and the title (which is displayed as the title of a query when it is executed). Only change the filename to “lesson1.query”.
After you used the “Finished” button, a new window will open, this time showing the query-editor.
Add a fact to the pivot-table
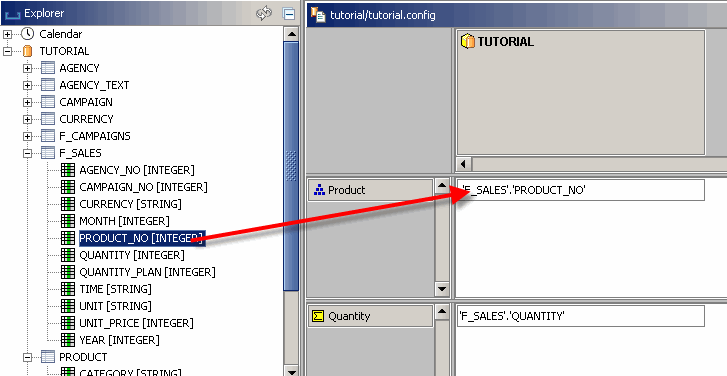
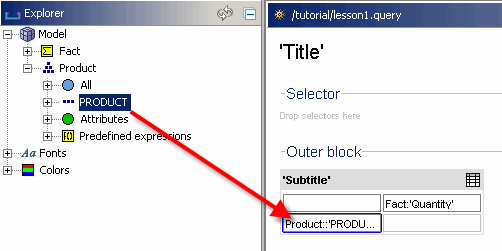
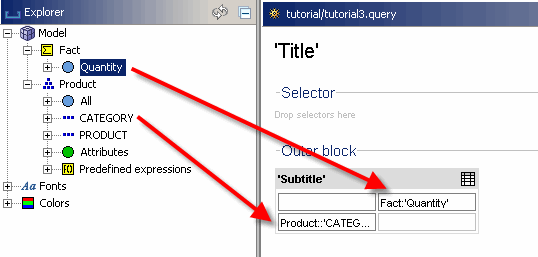
The new query contains by default an empty pivot table with no header in the x- or y-axis. You can add new headers (which will define the rows and cells of your query) by dragging them out of the model-explorer at the upper left side of the Workbench. Facts are shown as a small yellow rectangle (containing a summary-sign) in the explorer after you opened the “Fact” dimension – there you should see the fact named “Quantity”.
Drag this fact to the empty header at the X-axis (where the text “drop columns here” is displayed).

The new header is now placed in the x-axis of your table and will generate a column when the query is executed.
Add a dimension to the pivot-table
Beside the fact in the X-axis we also want to generate rows – e.g. one row for each member stored in our product dimension. Double-click the product dimension in the model explorer to open it and see its contents. Now you can see (and open) the root-key of the dimension, its levels and some predefined formulas (formulas are shown as a small yellow rect containing an “f()”).
The level “PRODUCT” of the product dimension is displayed with the level-symbol (containig three dots in a row). Now drag this level to the y-axis of your pivot-table.
In difference to the fact you added to the table before, this new header will not only create a single header but one header for each single product stored in the product dimension.
Test your query
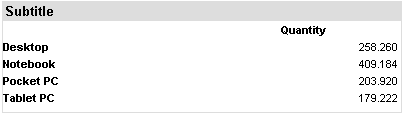
Now your first query is finished, showing on row for each product and a column containing the fact “Quantity”. Use the “Preview” tab at the bottom of the editor to execute the query and to preview its result.
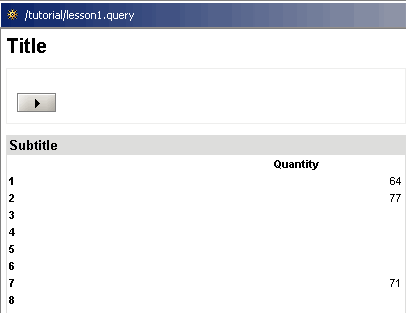
Because there is not data for every single product stored in the fact-table, some of the rows will be empty. Also, the products are displayed with their technical IDs because we used the IDs to generate the dimension. The following lessons will show how to display the products-names instead of their IDs and how to supress the empty rows.
Save your query
Don’t forget to save your query before continuing your work. Like in the configuration-editor before, you can use the “Save” button of the Workbench to save the query.
From instantOLAP 3.0 on you can easyly create reports within your browser. As simple as Excel-Pivot. Please see also Cantor ERP example
Lesson 2: Adding a display-text to the dimenson
Linking tables
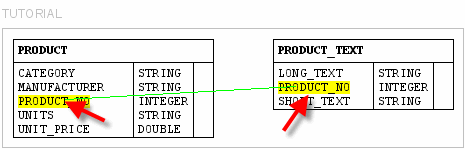
In the tutorial-database, the text for the products is stored in another table than the products. There is a table named “PRODUCT_TEXT”, which contains the ID of a product and its text (both a short- and a long-text).
Because the text is stored in a second table the system must know how these both tables are connected (joined) to each other. In instantOLAP you must define joins between two tables if you want to use them in the same key-loader or sql-cube.
The easiest way to join two or more tables is to use the ERM diagram editor of the configuration editor. Open the configuration and switch to the datasource tabulator to see the ERM diagram. Initially this diagram will be empty because it only displays the tables which you dragged into before (but you may still use other tables even if they are not contained in the ERM).
To add tables to the diagram, open the database in the database explorer (at the left border of the workbench) and simply drag them onto the diagram. For our example you will have to drag the tables “PRODUCT” and “PRODUCT_TEXT” into the diagram.
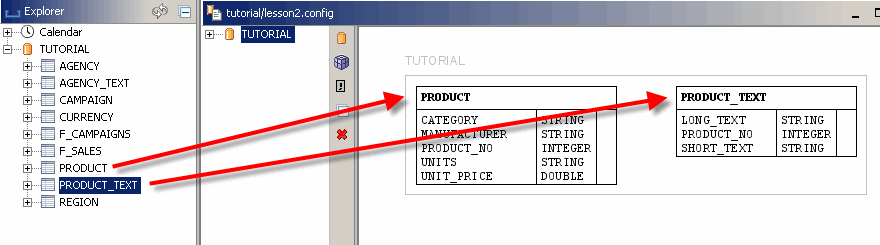
No you can define a join between the two tables by “drawing” a line from the source column to the target column. In this example the source column will be the column “PRODUCT_NO” of the table “PRODUCT” and the target column will be the column “PRODUCT_NO” of the table “PRODUCT_TEXT”.
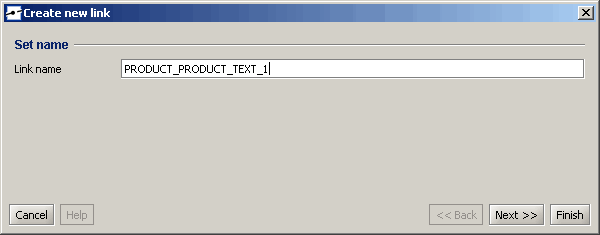
After you connected the columns and release the mouse button, a wizard window will open which allows you to refine the link. On the first page you can change the name of the link (each link must have a unique name).
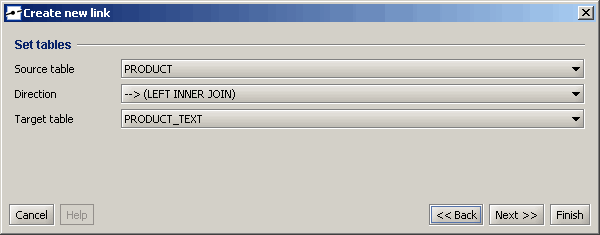
The following page will show the source- and the target-table of your link as you defined them with the mouse. Also, the direction and the type of the join is changeable here (joins can be unidirectional or bidirectional in instantOLAP, also you can define outer joins by chaning the type).
The last page will let you change the columns of the link. You can also add further columns to your link if the primary key of the tables is made of more than one column.
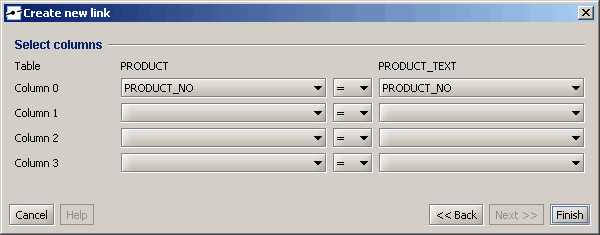
Then use the “Finish” button to add the join to your ERM diagram. If you don’t want to change any property of the link it is also possible to finish the link on the first page of the wizard.
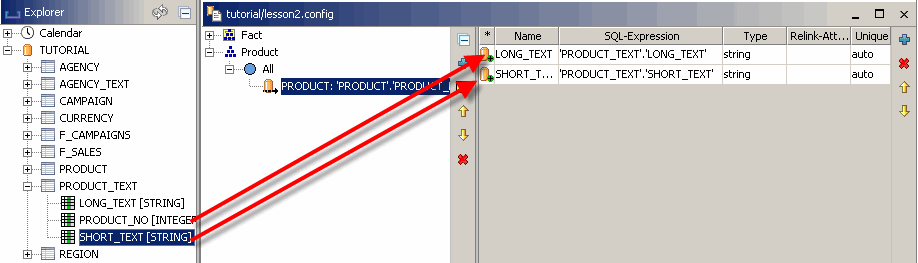
Adding an attribute to the product-dimension
Because in the previous lesson we already created a loader for the products the only thing we have to to is to add the columns as attributes to the existing loader. Navigate to the loader in the dimension tree and select it – then you can see an empty table with attribute-definition at the right half of the configuration editor.
Now drag both column onto the table to define them as attributes. When dragging the columns, the mouse pointer will indicate when dropping the columns is possible.
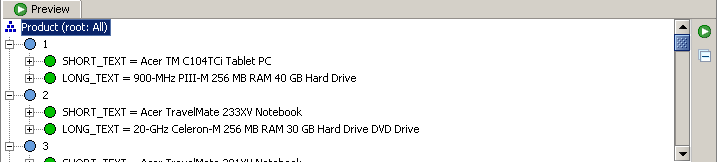
When executing the preview for the dimension in the lower preview window you will see the attribute-values now.
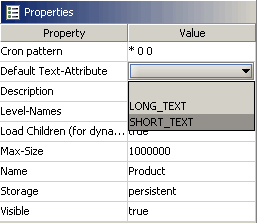
Setting the default text-attribute for a dimension
In order to change the default text-attribute you must select the dimension node in the dimension tree and edit the property “Default Text-Attribute” of the dimension. The property will let you select one of all attributes beein defined for the dimension – e.g. select the attribute “SHORT_TEXT” here.
If you reexecute the query of the previous lesson now you will see that the text of the displayed products changed from their technical IDs to their product name.
Lesson 3: Creating a dimension with a hierarchie
Adding a new loader for the two additional hierarchy-levels
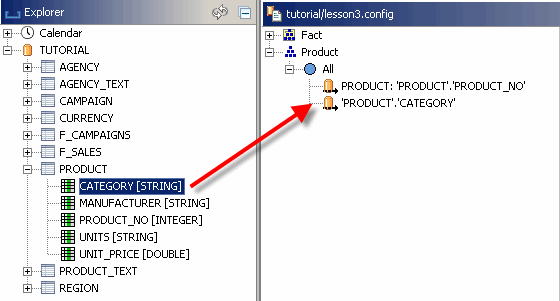
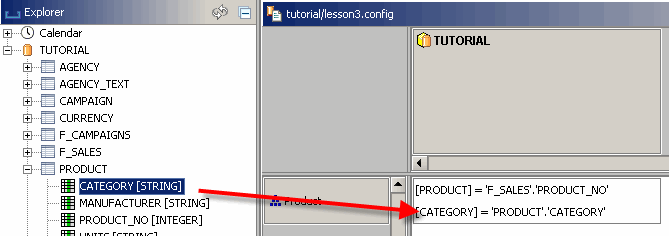
Because we want to extend the dimension, you must change to the “Dimension” tabulator at the bottom of the editor. Open the product dimension to see its loaders. Now you can drag the column “CATEGORY” out of the “PRODUCT” table onto the root-key of the dimension root key like you did with the product number in the first lesson.
By dragging the CATEGORY column you now created the new first level of the dimension. The product loader we created in lesson 1 is displaced now, because we want the products to be located under the categories (now they would appear at the same level with the categories). Changing the loader-position is quite simple, just drag the old loader onto the new category-loader to encapsulate it there.
Don’t forget to assign a level name to the new loader by selecting it and changing the property “Level Name”, e.g. to the level-name “CATEGORY”.
Finally we created a product dimension with three levels (root, category and products). Again use the preview-window to check the content of the dimension.
Extending the dimension-binding in the cube
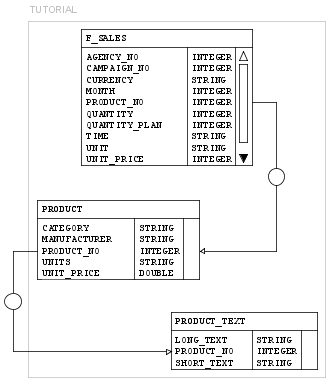
In the previous version of the cube the binding was simple because our fact table in the database contains a column “PRODUCT_NO” which exactly matches the product-keys in our dimension. Now we want to add a new binding for the categories but there is not category-column in our fact table. Therefore we’ll have to add a new join between the fact-table and the product-table in order to use the column “CATEGORY” of the table “PRODUCT” for the new binding.
Like in the lesson before, you can drag the fact table “F_SALES” in to the ERM diagram and link it to the table “PRODUCT” using the mouse. Note that you always should define links from the fact-table to the dimension tables.
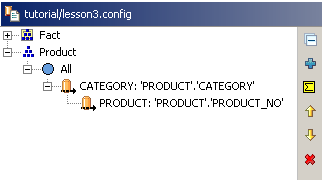
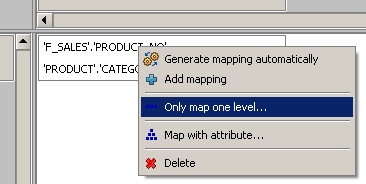
Now you can switch to the “Cubes” tabulator in the configuration editor and add a second mapping for the dimension “Product” to your cube. For this, simply drag the column “CATEGORY” out of the table “PRODUCT” into the dimension-cell of the cube and a second mapping will be added to it.
But now we have two different mappings for the same dimension. The problem is that the cube does not know which mapping should be used for which level of the dimension. To define this you can use the menu-item “Only map one level…” of the cube-cell and define the level for a mapping. Select “PRODUCT” for the first and “CATEGORY” for the new mapping – now there are different mappings for different levels.
After you added the new mapping and defined their levels the SQL-cube should look as in the following picture:
Add drilldown to your query
Test your existing query
If you reopen your query and execute it again, you will still the products as rows because in the previous definition of the query we told the system to display the level named “PRODUCT” on the y-axis. Though the level changed and went deeper in the hierarchy of the dimension, it has still the same name.
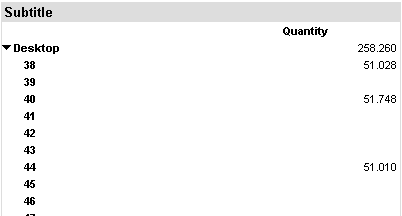
Now we will create another query, which displays the level “CATEGORY” on the y-axis instead of the level “PRODUCT”. Again, drop the fact “Quantity” onto the axis.
If you execute this query you will see that the number of rows has decreased dramatically. This is because the new first level of our dimension has less elements than the product levels and our query display this new level of the dimension.
As you can also see, the cells are still filled with numbers. These are the aggregated by SQL-cube which generated a SELECT statement using the column “CATEGORY” out of the table “PRODUCT” as its GROUP BY expression.
Enabling drill-down
> There are two different styles for drilldown in instantOLAP (vertical and encapsulated) which differ in the diplay of the newly opended headers. In the ‘vertical’ style, the become new rows in the table, in the ‘encapsulated’ style the become subheaders of their parent header.
Now execute the query again. You will see little triangles before each header. This is the drilldown button for a header – if you click onto it the header will expand and show its children-elements inside the pivot-table:
After you drilled down into a header, the symbol of this header changes to a different symbol (the drill-up symbol) which you can use then to close the header again.
Lesson 4: Adding a time-dimension
In this lesson will we will learn how to set up a calendar-dimension and how to connect it to the cube.
Adding the time-dimensionAdding loaders
There are two columns named “YEAR” and “MONTH” in the fact table which we could use to populate the new dimension. But the more elegant way is to use the build-in calendar from instantOLAP to our time-dimension. Using the internal calendar offers more flexibilty and will not generate gaps for missing months in your dimension (if you would use the database as source, only months with data would be generated).
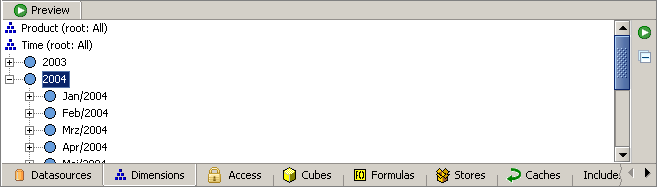
Switch the datasource explorer at the upper-left corner to the “Calendar” view by selecting the element “Calendar” in the combo-box. Now you can see a number of pre defined time-patterns for your usage. Start with dragging the pattern “yyyy” (which stands for a four digit year-number) onto the root-key of the time dimension.

Don’t forget to give a name to your newly created level, e.g. name it “YEAR”.
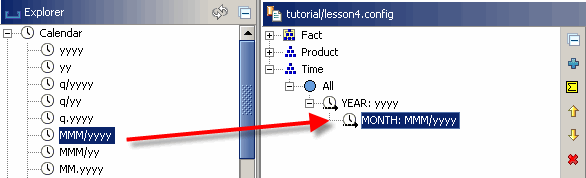
Then drag the pattern “mmm/yyyy” (which generates month-names combined with years) onto the just created year-loader. Again, give a name to your new level, this time name it “MONTH”.
Setting the time-rage
When you open the dimension in the preview-window, you can see there is only one month beeing generated. This is because we did not set the range for the generated calendar-keys, and the default-range is from “now” to “now” (so the only year and month you can see is the current year/month).

But the tutorial database contains sales for the years 2003 and 2004. Click onto topmost calendar-loader to see its properties in the property-editor. Now you can see two properties called “Start” and “Stop” – the time-range has to be defined in here. E.g. set “Start” to “01.01.2003” and “Stop” to “31.12.2004” to define the numbers of keys we want to create (if your country has a different date-format, you have to use your local format).
Now reload the dimension in the preview and again have a look into the time dimension. There should be two years (2003 and 2004) and twelve months per year now.
Adding attributes
For the level MONTH we will now add an attribute containing a technical ID for the month which can be bound to the fact table F_SALES the. In the fact table there is a column “TIME” where the month is identified by a text in the format “MMyyyy”.
First select the loader for the month-level until you see its attributes in the area right to the dimension-tree. Now add a new and empty attribute to the loader by using the “Add attribute” button at the right border of the attribute panel – a new line should apper. Name the attribute “MonthID”, change its pattern to “MMyyyy” and set the type to “string”.
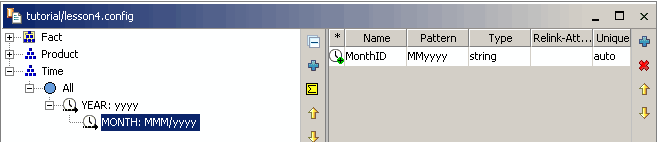
We did not use the calender from the datasource explorer because there is no predefined format “MMyyyy”. But you can also create attribute manually and use any format or drag another format from the calender and change the pattern afterwards.
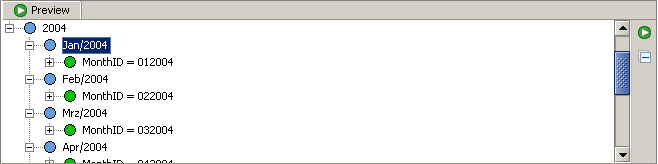
If you preview the time-dimension every month should have a unique MonthID now:
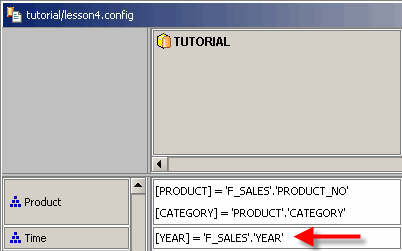
Connect the cube with the new dimension
The table “F_SALES” contains two columns “YEAR” and “TIME”. Start draging the first this column “YEAR” onto the new cell belonging to the new dimension. Like with the product dimension before, you have to map this column to a single level using the context menu of the cell and selecting “YEAR” as the only mapped level.
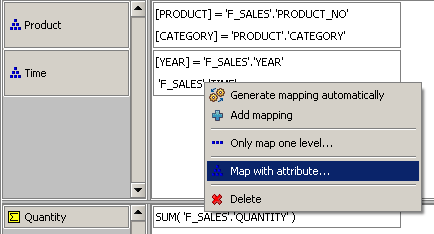
Now drag the column “TIME” into the same cell – this column contains values matching the attribute “MonthID” of the time dimension but it does not match any key of the dimension. Therefore you have to tell the system to map the column to an attribute instead of limiting the mapping to a single level.
To do this open the context-menu of the new mapping and use the menu item “Map with attribute…” and select the attribute “MonthID” (this should be the only selectable attribute till now).
Now you mapped the both levels of our new time dimension a you can use the new dimension in your queries.
Using the time-dimension in your query
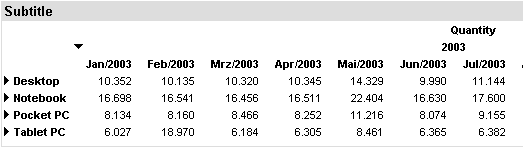
Like with the products, you should open the time dimension and drag the level “YEAR” below the fact header.
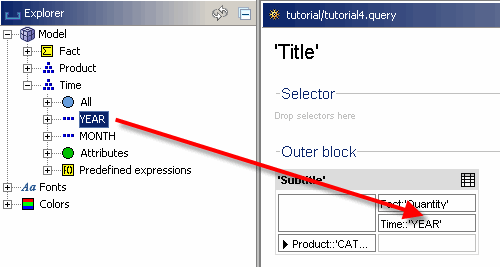
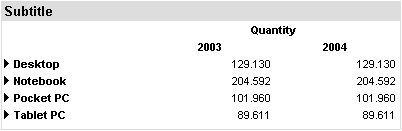
Now switch into the preview-mode and have a look. The table should have two columns now, one for each year.
Like in the previous lesson you can also add drilldown to the new month header. Again use the context menu of the header to activate the drilldown, e.g. use the “encapsulated drilldown” this time.